Developer Guide
Table of Contents
- Acknowledgements
- Setting up, getting started
- Design
- Implementations
- Documentation, logging, testing, configuration, dev-ops
- Appendix: Requirements
- Appendix: Instructions for manual testing
Acknowledgements
- GitHub Copilot auto-complete was used to improve productivity during development.
- Extra library
org.controlsfx:controlsfx:11.1.1was used to implement Autocomplete to improve productivity during development.
Setting up, getting started
Refer to the guide Setting up and getting started.
Design
.puml files used to create diagrams in this document docs/diagrams folder. Refer to the PlantUML Tutorial at se-edu/guides to learn how to create and edit diagrams.
Architecture
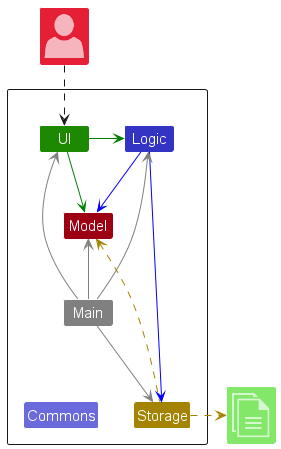
The Architecture Diagram given above explains the high-level design of the App.
Given below is a quick overview of main components and how they interact with each other.
Main components of the architecture
Main (consisting of classes Main and MainApp) is in charge of the app launch and shut down.
- At app launch, it initializes the other components in the correct sequence, and connects them up with each other.
- At shut down, it shuts down the other components and invokes cleanup methods where necessary.
The bulk of the app’s work is done by the following four components:
-
UI: The UI of the App. -
Logic: The command executor. -
Model: Holds the data of the App in memory. -
Storage: Reads data from, and writes data to, the hard disk.
Commons represents a collection of classes used by multiple other components.
How the architecture components interact with each other
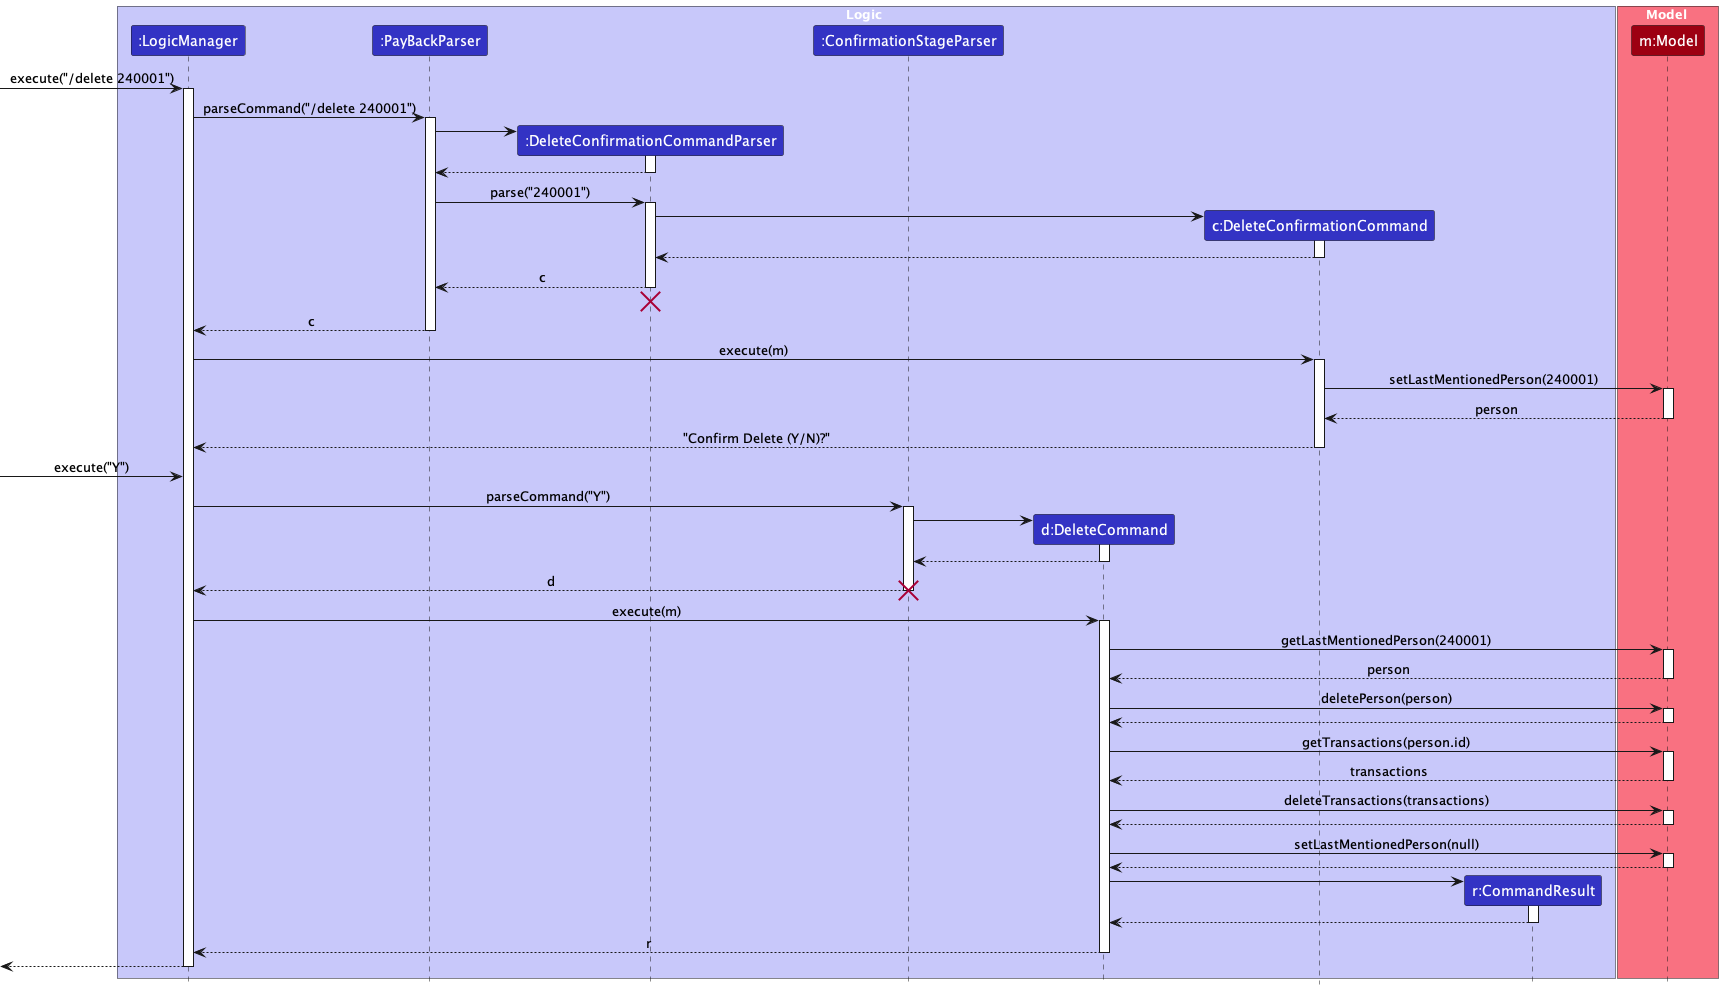
The Sequence Diagram below shows how the components interact with each other for the scenario where the user issues the command /delete 240001.
Each of the four main components (also shown in the diagram above),
- defines its API in an
interfacewith the same name as the Component. - implements its functionality using a concrete
{Component Name}Managerclass (which follows the corresponding APIinterfacementioned in the previous point.
For example, the Logic component defines its API in the Logic.java interface and implements its functionality using the LogicManager.java class which follows the Logic interface. Other components interact with a given component through its interface rather than the concrete class (reason: to prevent outside component’s being coupled to the implementation of a component), as illustrated in the (partial) class diagram below.
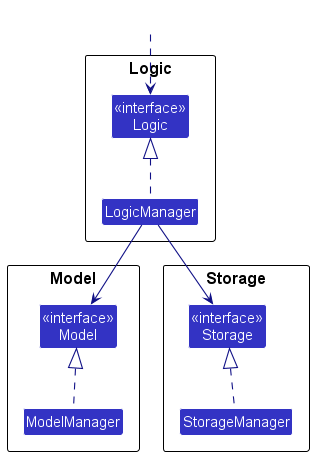
The sections below give more details of each component.
UI component
The API of this component is specified in Ui.java
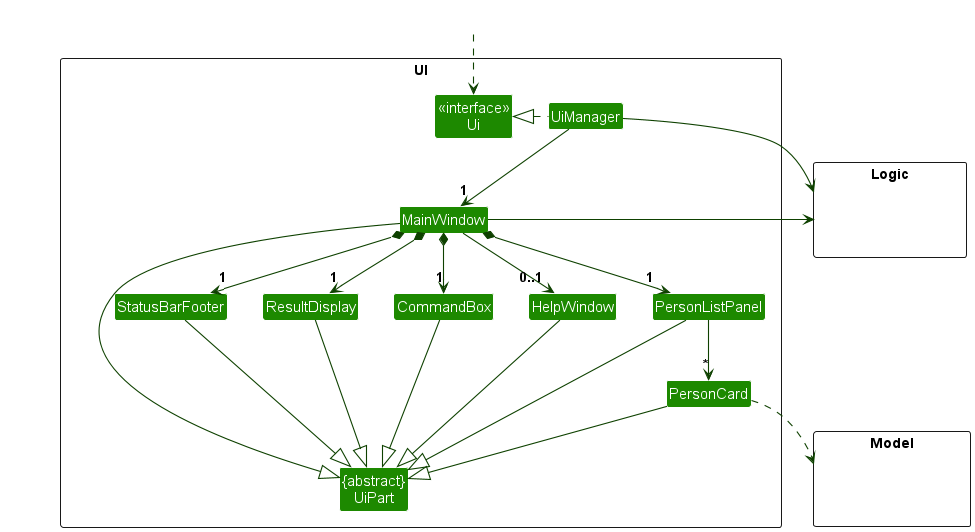
The UI consists of a MainWindow that is made up of parts e.g.CommandBox, ResultDisplay, PersonListPanel, StatusBarFooter etc. All these, including the MainWindow, inherit from the abstract UiPart class which captures the commonalities between classes that represent parts of the visible GUI.
The UI component uses the JavaFx UI framework. The layout of these UI parts are defined in matching .fxml files that are in the src/main/resources/view folder. For example, the layout of the MainWindow is specified in MainWindow.fxml
The UI component,
- executes user commands using the
Logiccomponent. - listens for changes to
Modeldata so that the UI can be updated with the modified data. - keeps a reference to the
Logiccomponent, because theUIrelies on theLogicto execute commands. - depends on some classes in the
Modelcomponent, as it displaysPersonobject residing in theModel.
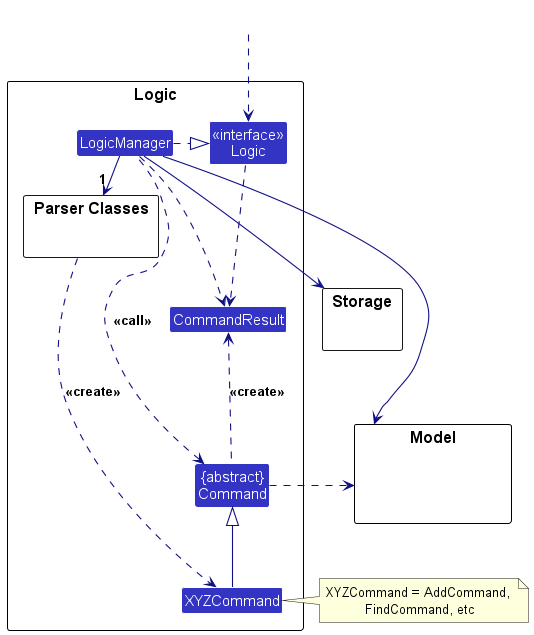
Logic component
API : Logic.java
Here’s a (partial) class diagram of the Logic component:
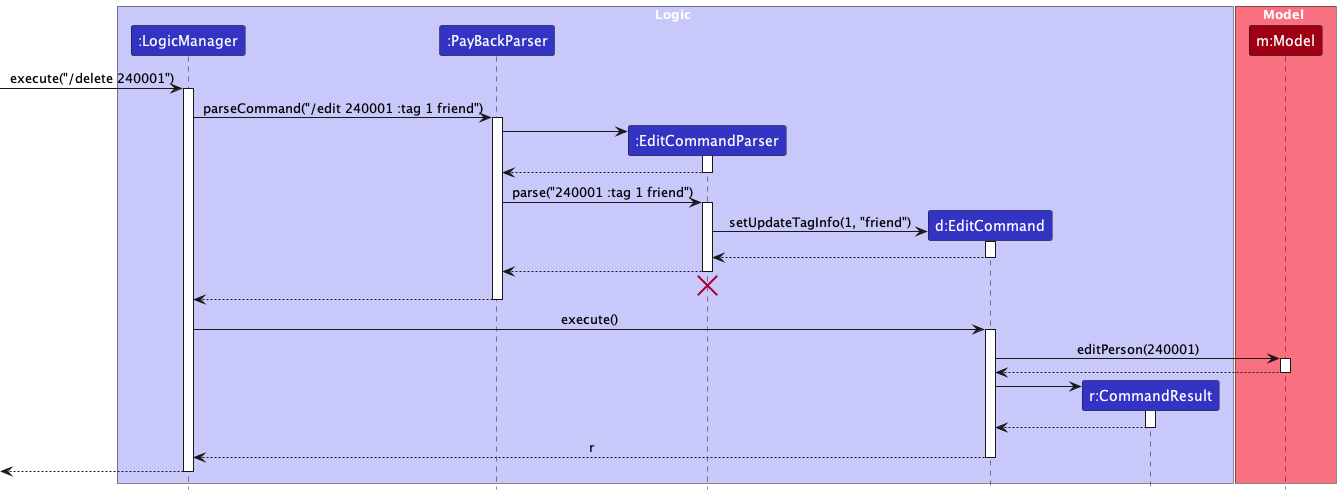
The sequence diagram below illustrates the interactions within the Logic component, taking execute("/delete 240001") API call as an example.

DeleteConfirmationCommandParser should end at the destroy marker (X) but due to a limitation of PlantUML, the lifeline continues till the end of diagram.
How the Logic component works:
- When
Logicis called upon to execute a command, it is passed to anPayBackParserobject which in turn creates a parser that matches the command (e.g.,DeleteCommandParser) and uses it to parse the command. - This results in a
Commandobject (more precisely, an object of one of its subclasses e.g.,DeleteConfirmationCommand) which is executed by theLogicManager. - The command can communicate with the
Modelwhen it is executed (e.g. to delete a person).
Note that although this is shown as a single step in the diagram above (for simplicity), in the code it can take several interactions (between the command object and theModel) to achieve. - The result of the command execution is encapsulated as a
CommandResultobject which is returned back fromLogic.
Here are the other classes in Logic (omitted from the class diagram above) that are used for parsing a user command:
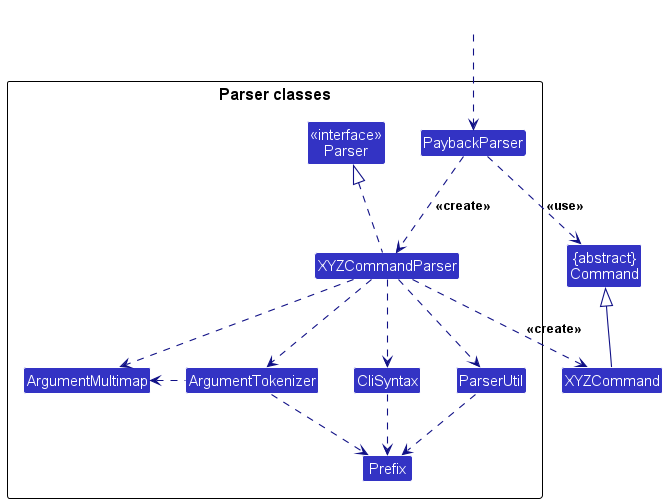
How the parsing works:
- When called upon to parse a user command, the
PaybackParserclass creates anXYZCommandParser(XYZis a placeholder for the specific command name e.g.,AddCommandParser) which uses the other classes shown above to parse the user command and create aXYZCommandobject (e.g.,AddCommand) which thePaybackParserreturns back as aCommandobject. - All
XYZCommandParserclasses (e.g.,AddCommandParser,DeleteCommandParser, …) inherit from theParserinterface so that they can be treated similarly where possible e.g, during testing.
Model component
API : Model.java
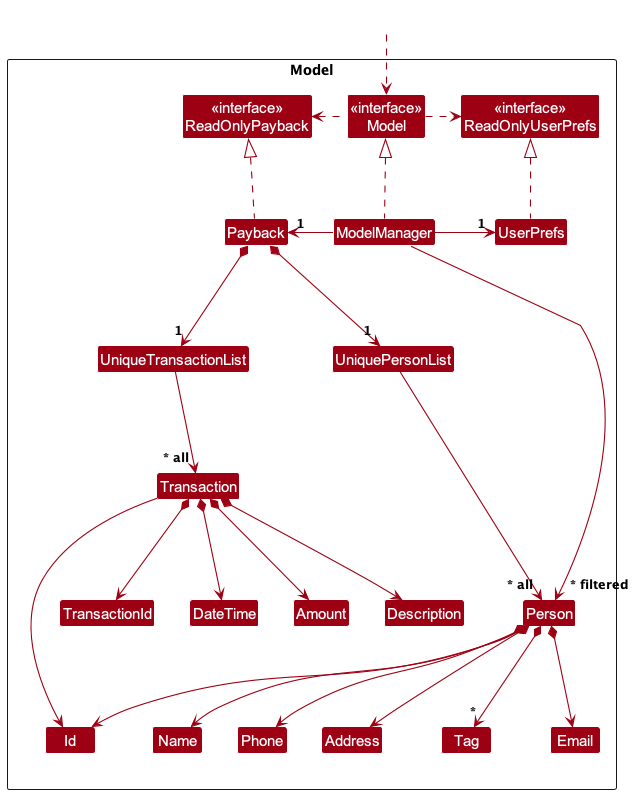
The Model component,
- stores the employee data i.e., all
PersonandTransactionobjects (which are contained inUniquePersonListandUniqueTransactionListobject respectively). - stores the currently ‘selected’
Personobjects (e.g., results of the /find command) as a separate filtered list which is exposed to outsiders as an unmodifiableObservableList<Person>that can be ‘observed’ e.g. the UI can be bound to this list so that the UI automatically updates when the data in the list change. - stores the currently ‘selected’
Transactionobjects (e.g., results of the /view command) as a separate filtered list which is exposed to outsiders as an unmodifiableObservableList<Transaction>that can be ‘observed’ e.g. the UI can be bound to this list so that the UI automatically updates when the data in the list change. - stores a
UserPrefobject that represents the user’s preferences. This is exposed to the outside as aReadOnlyUserPrefobjects. - does not depend on any of the other three components (as the
Modelrepresents data entities of the domain, they should make sense on their own without depending on other components)
Tag list in the Payback, which Person references. This allows Payback to only require one Tag object per unique tag, instead of each Person needing their own Tag objects.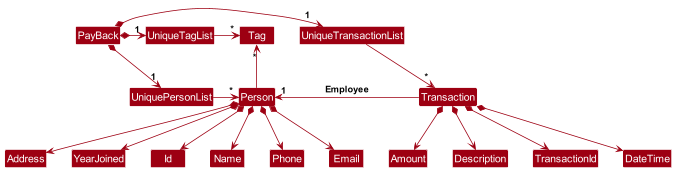
Storage component
API : Storage.java
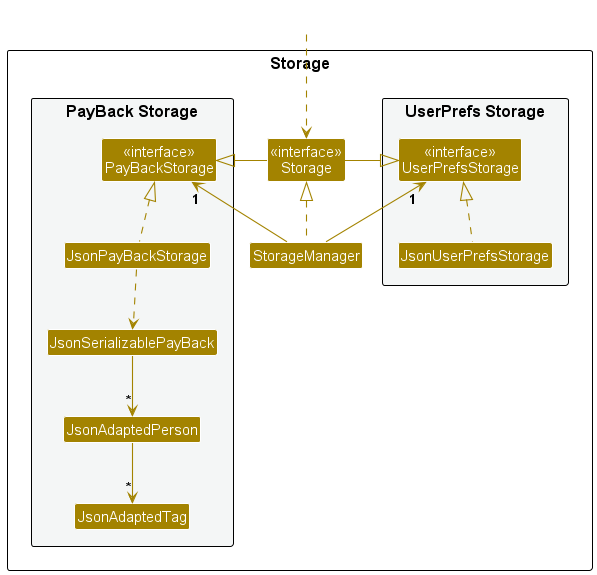
The Storage component,
- can save both employee data and user preference data in JSON format, and read them back into corresponding objects.
- inherits from both
PayBackStorageandUserPrefStorage, which means it can be treated as either one (if only the functionality of only one is needed). - depends on some classes in the
Modelcomponent (because theStoragecomponent’s job is to save/retrieve objects that belong to theModel)
Common classes
Classes used by multiple components are in the seedu.address.commons package.
Implementation
This section describes some noteworthy details on how certain features are implemented.
[Implemented] Add new employee
Implementation
The proposed implementation of adding a new employee is facilitated by AddCommand and AddCommandParser. The AddCommand class encapsulates the logic for adding a new employee, while the AddCommandParser class is responsible for parsing the arguments and returning an AddCommand object.
The AddCommand class implements the following operations:
-
AddCommand#execute(Model model)— Adds a new employee to the employee list in theModel. -
AddCommand#equals(Object other)— Checks if twoAddCommandobjects are equal. -
AddCommand#toString()— Returns a string representation of theAddCommand.
The AddCommandParser class implements the following operations:
-
AddCommandParser#parse(String args)— Parses the arguments and returns anAddCommandobject. -
AddCommandParser#arePrefixesPresent(ArgumentMultimap argMultimap, Prefix... prefixes)— Checks if the specified prefixes are present in the argument multimap.
Given below is an example usage scenario and how the add new employee mechanism behaves at each step.
Step 1. The user launches the application for the first time. The Model will be initialized with the initial employee list.
Step 2. The user executes /add :name John Doe :phone 91234567 :email johndoe@email.com :address 12 Kent Ridge Dr :year 2024 :tag Finance command to add a new employee with the specified details. The AddCommandParser will parse the arguments and return an AddCommand object.
Step 3. The AddCommand object will be executed by the Logic component, which will add the new employee to the employee list in the Model.
The following sequence diagram shows how an add new employee operation goes through the Logic component:

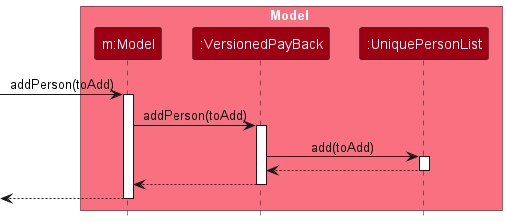
Similarly, how an add new employee operation goes through the Model component is shown below:
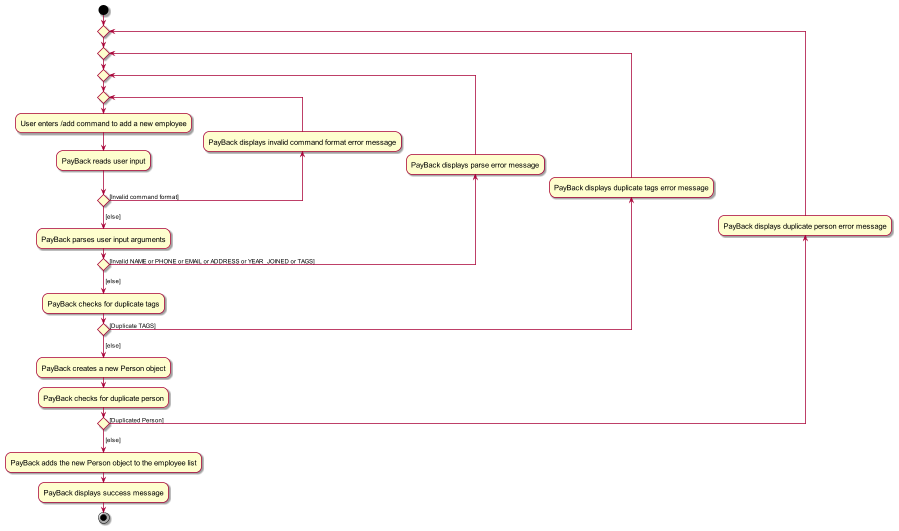
The following activity diagram summarizes what happens when a user executes an /add command:
The AddCommand class is designed to be easily extensible. For example, if a new field is added to the Person class, the AddCommand class can be easily modified to accommodate the new field.
Design considerations:
Aspect: How /add executes:
-
Alternative 1 (current choice): Enter all details at once.
- Pros: Easy to implement.
- Cons: May be overwhelming for users who are not familiar with the system.
-
Alternative 2: Enter details one by one.
- Pros: Provides a more guided experience.
- Cons: May be slower for users who are comfortable with the system.
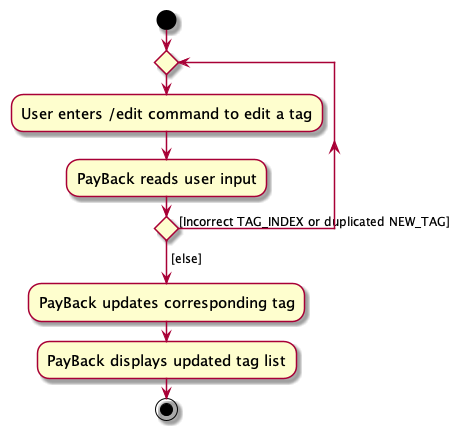
[Implemented] Editing a specific tag
Design considerations:
Aspect: How /edit ID :tag TAG_INDEX NEW_TAG executes:
-
Alternative 1 (current choice): Change one specific tag at a time.
- Pros: Most of the time people only want to change one particular tag and this implementation gives them more convenience.
- Cons: Harder to implement and have to change original data structure of tags.
-
Alternative 2: Remove all current tags and add new tags
- Pros: Easy to implement.
- Cons: Not very user-friendly as users have to key in all tags every single time.
Implementation
Given below is an example usage scenario and how the /edit ID :tag TAG_INDEX NEW_TAG mechanism behaves at each step.
Step 1. The user launches the application for the first time.
Step 2. The user executes /add NAME; PHONE; EMAIL; ADDRESS; YEAR_JOINED[; TAG]… command to add a new employee.
Step 3. The user executes /tag ID :tag NEW_TAG command to add tags to an existing employee.
Step 4. The user executes /edit ID :tag TAG_INDEX NEW_TAG command to change the name of an existing tag.
The following sequence diagram shows how an edit operation edits a specific tag for user:
The following activity diagram summarizes what happens when a user executes a /edit ID :tag TAG_INDEX NEW_TAG command:
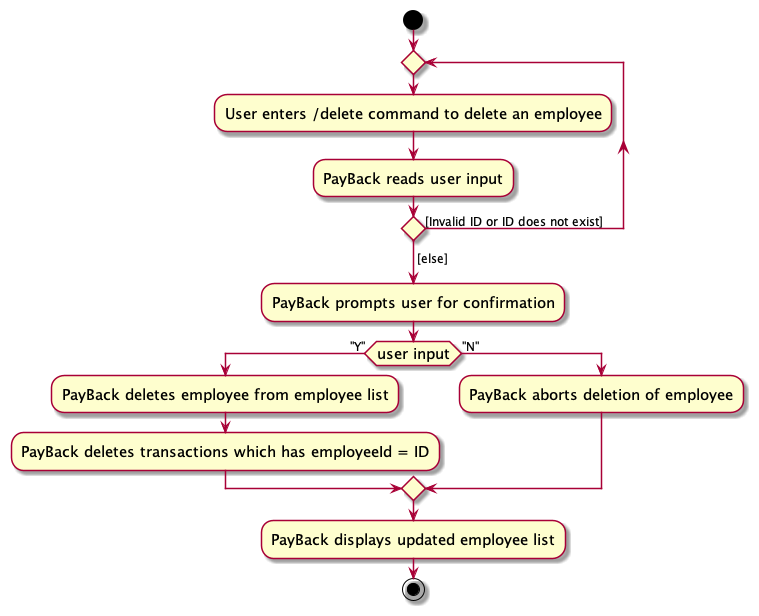
[Implemented] Deleting a specific employee
Implementation
Given below is an example usage scenario and how the /delete ID mechanism behaves at each step.
Step 1. The user launches the application for the first time.
Step 2. The user executes /add NAME; PHONE; EMAIL; ADDRESS; YEAR_JOINED[; TAG]… command to add a new employee.
Step 3. The user executes /delete ID command to prompt confirmation message for deletion of employee.
Step 4. The user executes Y command to confirm deletion of employee.
The following sequence diagram shows how delete operation deletes a specific user:
The following activity diagram summarizes what happens when a user executes a /delete ID followed by Y or N command:
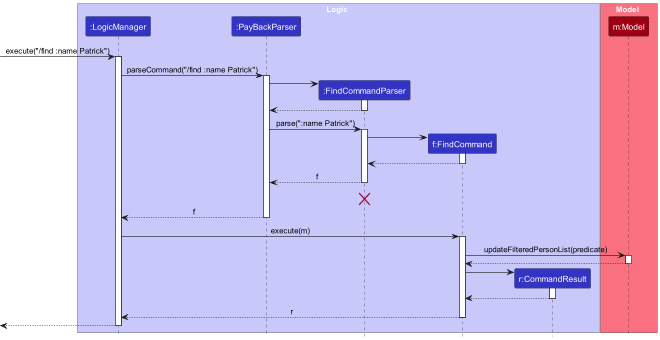
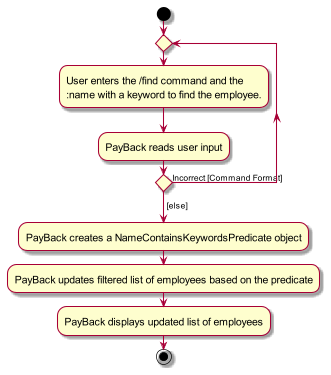
[Implemented] Finding a specific emplyoee
Implementation
Given below is an example usage scenario and how the /find :name KEYWORD mechanism behaves at each step.
Step 1. The user launches the application for the first time.
Step 2. The user executes /add NAME; PHONE; EMAIL; ADDRESS; YEAR_JOINED[; TAG]… command to add a new employee.
Step 3: The user executes /find :name KEYWORD command to find the employee who contains the KEYWORD.
Step 5: Show the updated employee panel list containing the employee who matches the KEYWORD.
The following sequence diagram shows how find operation finds a specific employee:
The following activity diagram what happens when a user executes a /find :name KEYWORD.
Documentation, logging, testing, configuration, dev-ops
Appendix: Requirements
Product scope
Target user profile:
- is a company manager
- has a need to manage a significant number of employees
- is required to handle a multitude of financial transactions (such as salary crediting, loans, etc)
- prefers typing to mouse interactions
- is reasonably comfortable using CLI apps
Value proposition: manage employee information more efficiently and clearly than a typical mouse/GUI driven app
User stories
Priorities: High (must have) - * * *, Medium (nice to have) - * *, Low (unlikely to have) - *
| Priority | As a … | I want to … | So that I can… |
|---|---|---|---|
* * * |
New Company Manager | read the instructions of the program | Learn or remember the lists of commands or methods to use the system |
* * * |
Company Manager | add a new employee | ensure they are officially recorded |
* * * |
Company Manager | remove/delete a employee | have an updated list of employees when they leave the company |
* * * |
Company Manager | find a employee by ID, name, phone or email | retrieve details of employee(s) without looking entire workers |
* * * |
Company Manager | edit information of a employee | rectify any incorrect inputs entered into the system |
* * * |
Company Manager | list entire employees | see entire employees |
* * |
Company Manager | create a tag to employee | recognize all types of attention |
* |
Company Manager | type my commands faster | work more efficiently |
* * |
Company Manager | double check my decision before actually deleting someone | ensure no one is accidentally deleted |
* * * |
Company Manager | add transactions to my employees | keep track of all transaction records |
* * * |
Company Manager | see the salary changes of my employees | keep track of salaries |
* * |
Company Manager | clear all employee information | restart my business |
Use cases
(For all use cases below, the System is the PayBack and the Actor is the Company Manager, unless specified otherwise)
Use case: Add a new employee
MSS
- User requests to add a new employee and enters the necessary details.
-
PayBack adds the employee to the employee list.
Use case ends.
Extensions
-
1a. PayBack detects an error in the entered data.
-
1a1. Payback shows an error message.
Use case resumes at Step 1.
-
-
1b. The employee already exists.
-
1b1. PayBack shows an error message.
Use case ends.
-
Use case: Delete an employee
MSS
- User requests to delete an employee and enters the necessary details.
- Payback shows the employee details and asks for confirmation to delete the employee.
- User confirms the deletion of employee.
-
PayBack deletes the employee from the employee list together with all transactions associated with the employee.
Use case ends.
Extension
-
1a. PayBack detects an error in the entered data.
-
1a1. Payback shows an error message.
Use case resumes at Step 1.
-
-
1b. The employee does not exist.
-
1b1. PayBack shows an error message.
Use case resumes at Step 1.
-
-
2a. User cancels the removal of employee.
-
2a1. PayBack acknowledges the cancellation.
Use case ends.
-
Use case: Edit an employee
MSS
- User requests to edit the details of an employee and enters the necessary details.
-
PayBack edits the employee’s details.
Use case ends.
Extensions
-
1a. PayBack detects an error in the entered data.
-
1a1. PayBack shows an error message.
Use case resumes at Step 1.
-
-
1b. The employee does not exist.
-
1b1. PayBack shows an error message.
Use case resumes at Step 1.
-
-
1c. The edited details are the same as the existing details.
-
1c1. PayBack shows an error message.
Use case resumes at Step 1.
-
-
1d. The edited details result in a duplicate employee.
-
1d1. PayBack shows an error message.
Use case resumes at Step 1.
-
Use case: List all employees
MSS
- User requests to list all employees.
-
PayBack displays the list of all employees.
Use case ends.
Extensions
-
1a. The employee list is empty.
-
1a1. PayBack displays an empty list.
Use case ends.
-
Use case: Find employee(s)
MSS
- User requests to find matching employee(s) based on search criteria and enters the necessary details.
-
PayBack displays the matching employee(s) based on the search criteria.
Use case ends.
Extensions
-
1a. PayBack detects an error in the entered data.
-
1a1. PayBack shows an error message.
Use case resumes at Step 1.
-
-
2a. No employee matches the search criteria.
-
2a1. PayBack displays an empty list.
Use case ends.
-
Use case: Tag an employee
MSS
- User requests to tag an employee and enters the necessary details.
-
PayBack tags the employee with the specified tag(s).
Use case ends.
Extension
-
1a. PayBack detects an error in the entered data.
-
1a1. PayBack shows an error message.
Use case resumes at Step 1.
-
-
1b. No employee matches the search criteria.
-
1b1. PayBack shows an error message.
Use case resumes at Step 1.
-
Use case: Add a transaction
MSS
- User requests to add a transaction to an employee and enters the necessary details.
-
PayBack adds the transaction to the transaction list.
Use case ends.
Extensions
-
1a. PayBack detects an error in the entered data.
-
1a1. PayBack shows an error message.
Use case resumes at Step 1.
-
-
1b. The employee does not exist.
-
1b1. PayBack shows an error message.
Use case resumes at Step 1.
-
Use case: View transaction records of an employee
MSS
- User requests to view the transaction records of an employee and enters the necessary details.
-
PayBack displays the transaction records of the employee.
Use case ends.
Extensions
-
1a. PayBack detects an error in the entered data.
-
1a1. PayBack shows an error message.
Use case resumes at Step 1.
-
-
2a. The employee does not exist.
-
2a1. PayBack shows an error message.
Use case resumes at Step 1.
-
Use case: Clear all data
MSS
- User requests to clear all data.
-
PayBack clears all data.
Use case ends.
Use case: View help page
MSS
- User requests to view the help page.
-
PayBack displays the link to the help page.
Use case ends.
Use case: Exit the program
MSS
- User requests to exit the program.
-
PayBack program exits.
Use case ends.
Non-Functional Requirements
- Should work on any mainstream OS as long as it has Java
11or above installed. - Should be able to hold up to 1000 employees without a noticeable sluggishness in performance for typical usage.
- A user with above average typing speed for regular English text (i.e. not code, not system admin commands) should be able to accomplish most of the tasks faster using commands than using the mouse.
- The system should provide real-time access to employee information with response times not exceeding 2 seconds for any query.
- The app should have an intuitive user interface, allowing users to easily navigate and perform tasks without extensive training.
Glossary
- Actor: A user or any other system that interacts with the system being described
- API: Abbreviation for Application Programming Interface, a set of rules and protocols that allows different software applications to communicate with each other
- Aspect: A particular feature or consideration that needs to be taken into account when designing or implementing a system
- CLI: Abbreviation for Command Line Interface, a text-based interface used for entering commands to interact with the application
- DevOps: A set of practices that combines software development (Dev) and IT operations (Ops), aimed at shortening the systems development life cycle and providing continuous delivery with high software quality
- GUI: Abbreviation for Graphical User Interface, a type of user interface that allows users to interact with the application through graphical icons and visual indicators, as opposed to text-based interfaces like command-line interfaces (CLI)
- JSON: Abbreviation for JavaScript Object Notation, a lightweight data-interchange format that uses key-value pairs
- Mainstream OS: Windows, Linux, Unix, MacOS
- MSS: Abbreviation for Main Success Scenario, the main flow of events in a use case
- Private contact detail: A contact detail that is not meant to be shared with others
- Tag: A label or identifier associated with a particular record or entity in the application
- UI: Abbreviation for User Interface, refers to the interface through which users interact with the application
Appendix: Instructions for manual testing
Given below are instructions to test the app manually.
Launch and shutdown
- Initial launch
- Download the jar file and copy into an empty folder
- Double-click the jar file Expected: Shows the GUI with a set of sample contacts.
- If unable to open the application by double-clicking, open terminal and navigate into the target file and type
java -jar payback.jarto launch the application.
- Shutdown the program
- Type
/exitin the command panel and pressEnter - The program will be closed automatically
- Type
Add Employee
- Adding new employees to the PayBack system and automatically generate an employee ID based on the year they joined and the last ID of that year.
- Test cases:
/add John Doe; 91234567; johndoe@email.com; 12 Kent Ridge Dr; 2024; Finance
Expected: A new employee named John Doe is added to the list. - Test cases:
/add :name John Doe :phone 91234567 :email johndoe@email.com :address 12 Kent Ridge Dr :year 2024 :tag Finance
Expected: A new employee named John Doe is added to the list.
- Test cases:
Deleting an employee
-
Deleting an employee while all employees are being shown
-
Prerequisites: List all employees using the
/listcommand. Multiple employees in the list. -
Test case:
/delete 240001followed byYto confirm
Expected: Employee with ID 240001 is deleted from the list. Details of the deleted contact shown in the status message. Timestamp in the status bar is updated. -
Test case:
/delete 230002
Expected: No employee is deleted. Error details shown in the status message. Status bar remains the same. -
Other incorrect delete commands to try:
delete,delete x,...(where x is larger than the list size)
Expected: Similar to previous.
-
Editing an employee
- Editing an employee’s information (the person must be shown in current list)
- Prerequisites: List all persons using the
/listcommand. Multiple persons in the list. - Test case:
/edit 240001 :name James
Expected: The name of employee with ID 240001 is changed to James.
- Prerequisites: List all persons using the
List All Employees
- Displaying a list of entire employees currently stored in the PayBack system.
- Test case:
/list
Expected: List of employees displayed.
- Test case:
Find Employee(s)
- Searching for matching employee(s) based on specific criteria.
- Test case:
/find :name Patrick Star
Expected: Searches employees with the name ‘Patrick Star’.
- Test case:
Tag An Employee
- Adding
tagsto the specified employee from the displayed employee list.- Test case:
/tag 240001 :tag Intern :tag Developer
Expected: Employee 240001 is tagged with ‘Intern’ and ‘Developer’.
- Test case:
Add A Transaction
- Adding a transaction to the specified employee.
- Prerequisites: The employee should be in the list.
- Test case:
/transaction 240001; 2000; Salary; 30/09/2021 12:00
Expected: A transaction is added to employee 240001.
View Transaction Records of An Employee
- Displaying the transaction records of the specified employee from the displayed employee list.
- Test case:
/view 240001
Expected: Transaction records of employee 240001 will be displayed on the right side of the employee list panel.
- Test case:
Clear All Data
- Removing all data from the PayBack system.
- Test case:
/clear
Expected: All data from the PayBack system is cleared.
- Test case:
Help
- Accessing help page.
- Test case:
/help
Expected: A message explaining how to access the help page is shown.
- Test case:
Exit the Program
- Exiting the program.
- Test case:
/exit
Expected: PayBack is safely closed.
- Test case: